This is default featured slide 1 title

Go to Blogger edit html and find these sentences.Now replace these sentences with your own descriptions.This theme is Bloggerized by Lasantha Bandara - Premiumbloggertemplates.com.

This is default featured slide 2 title

Go to Blogger edit html and find these sentences.Now replace these sentences with your own descriptions.This theme is Bloggerized by Lasantha Bandara - Premiumbloggertemplates.com.

This is default featured slide 3 title

Go to Blogger edit html and find these sentences.Now replace these sentences with your own descriptions.This theme is Bloggerized by Lasantha Bandara - Premiumbloggertemplates.com.

This is default featured slide 4 title

Go to Blogger edit html and find these sentences.Now replace these sentences with your own descriptions.This theme is Bloggerized by Lasantha Bandara - Premiumbloggertemplates.com.

This is default featured slide 5 title

Go to Blogger edit html and find these sentences.Now replace these sentences with your own descriptions.This theme is Bloggerized by Lasantha Bandara - Premiumbloggertemplates.com.

Showing posts with label Window Tips. Show all posts

Wednesday, January 16, 2013

Share a Printer on Your Network from Vista or XP to Windows 7


Share a Printer on Your Network from Vista or XP to Windows 7

The other day we looked at sharing a printer between Windows 7 machines, but you may only have one Windows 7 machine and the printer is connected to a Vista or XP computer. Today we show you how to share a printer from either Vista or XP to Windows 7.
We previously showed you how to share files and printers between Windows 7 and XP. But what if you have a printer connected to an XP or Vista machine in another room, and you want to print to it from Windows 7? This guide will walk you through the process.
Note: In these examples we’re using 32-bit versions of Windows 7, Vista, and XP on a basic home network. We are using an HP PSC 1500 printer, but keep in mind every printer is different so finding and installing the correct drivers will vary.
Share a Printer from Vista
To share the printer on a Vista machine click on Start and enter printers into the search box and hit Enter.
1vista
Right-click on the printer you want to share and select Sharing from the context menu.
Now in Printer Properties, select the Sharing tab, mark the box next to Share this printer, and give the printer a name. Make sure the name is something simple with no spaces then click Ok.
Share a Printer from XP
To share a printer from XP click on Start then select Printers and Faxes.
In the Printers and Faxes window right-click on the printer to share and select Sharing.
In the Printer Properties window select the Sharing tab and the radio button next to Share this printer and give it a short name with no spaces then click Ok.
Add Printer to Windows 7
Now that we have the printer on Vista or XP set up to be shared, it’s time to add it to Windows 7. Open the Start Menu and click on Devices and Printers.
In Devices and Printers click on Add a printer.
Next click on Add a network, wireless or Bluetooth printer.
Windows 7 will search for the printer on your network and once its been found click Next.
The printer has been successfully added…click Next.
Now you can set it as the default printer and send a test page to verify everything works. If everything is successful, close out of the add printer screens and you should be good to go.
 
Alternate Method
If the method above doesn’t work, you’ll can try the following for either XP or Vista. In our example, when trying to add the printer connected to our XP machine, it wasn’t recognized automatically.
If you’re search pulls up nothing then click on The printer that I want isn’t listed.
In the Add Printer window under Find a printer by name or TCP/IP address click the radio button next to Select a shared printer by name. You can either type in the path to the printer or click on Browse to find it.
In this instance we decided to browse to it and notice we have 5 computers found on the network. We want to be able to print to the XPMCE computer so we double-click on that.
Type in the username and password for that computer…
Now we see the printer and can select it.
The path to the printer is put into the Select a shared printer by name field.
Wait while Windows connects to the printer and installs it…
It’s successfully added…click Next.
Now you can set it as the default printer or not and print a test page to make sure everything works successfully.
Now when we go back to Devices and Printers under Printers and Faxes, we see the HP printer on XPMCE.
Conclusion
Sharing a printer from one machine to another can sometimes be tricky, but the method we used here in our setup worked well. Since the printer we used is fairly new, there wasn’t a problem with locating any drivers for it. Windows 7 includes a lot of device drivers already so you may be surprised on what it’s able to install. Your results may vary depending on your type of printer, Windows version, and network setup. This should get you started configuring the machines on your network—hopefully with good results. 
If you you have two Windows 7 computers, then sharing a printer or files is easy through the Homegroup feature. You can also share a printer between Windows 7 machines on the same network but not Homegroup.
Automatically Forward Email in Outlook 2010/2007


How to forward your Outlook 2010 or 2007 email automatically to another email address. Useful for when you are going away on vacation, or using a different email address for a certain period of time.
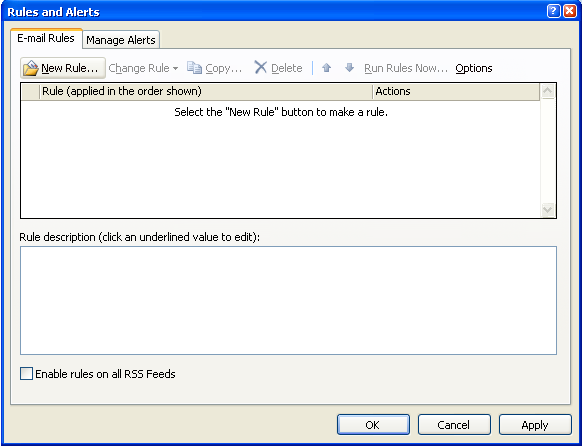
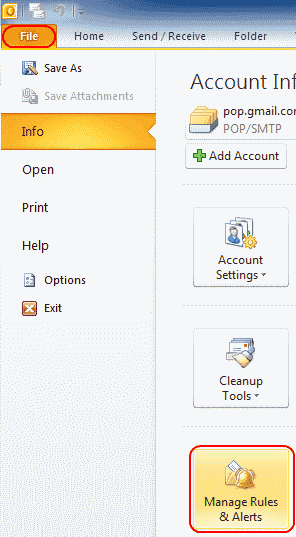
1. In Outlook 2010, select File > Rules and Alerts. In Outlook 2007, select Tools > Rules and Alerts.
Outlook 2010 manage rules and alerts
2. From the Email Rules tab, choose New Rule…
Forwarding Email - New Rule
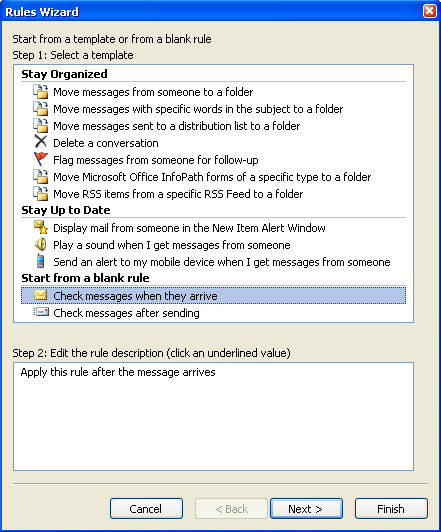
2. Select under Start from a blank rule select Check messages when they arriveand click Next.
Forwarding Email - Blank Rule
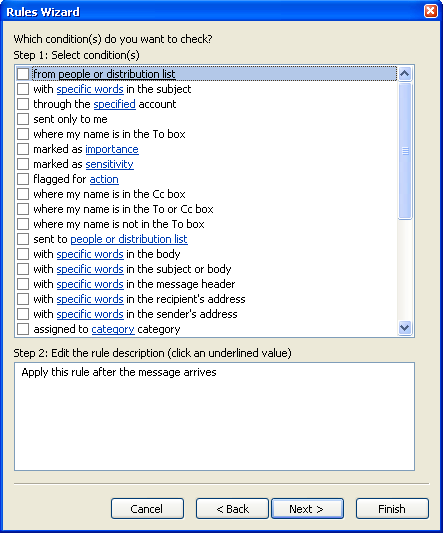
3. If you wish to only forward certain messages, you can select conditions for each message that gets forwarded. If you want all your messages to be forwarded, leave everything unchecked. You will get a message This rule will be applied to every message you receive. Is this correct? Select Yes.
Forwarding Email - Conditions
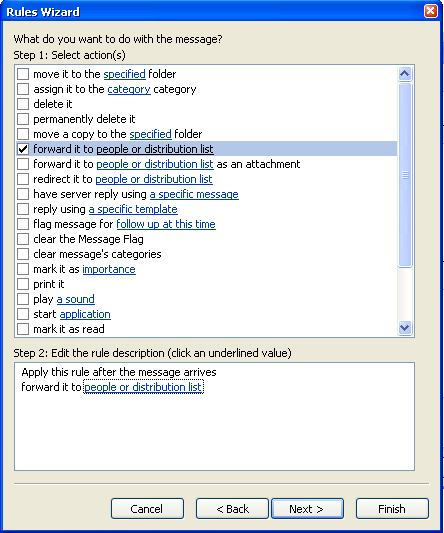
4. Check forward it to people or distribution list. In the lower pane, click people or distribution list.
Forwarding Email - Actions
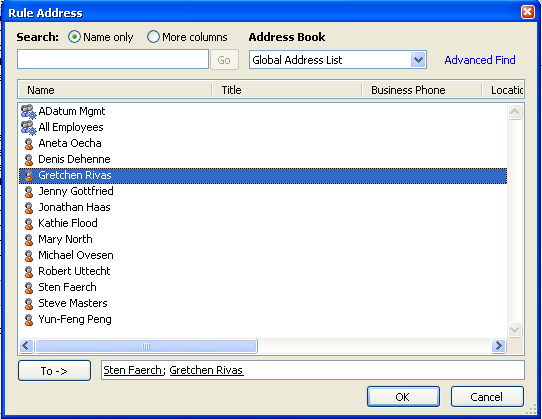
5. This will open the Rule Address window with the address book. Search for the email address(es) to which you would like to forward your mail. You can also just type the full email addresses in the To field. Click OK then Next when done.
Forwarding Email - Email Address Selection
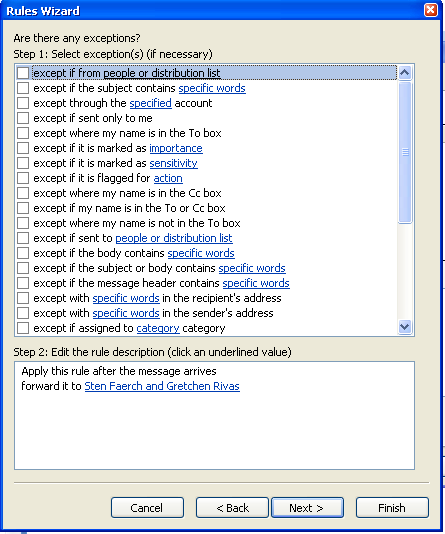
6. The box to setup exceptions appears. Select any exceptions you would like to apply to this rule and click Next. Most users leave this blank.
Forwarding Email - Exceptions
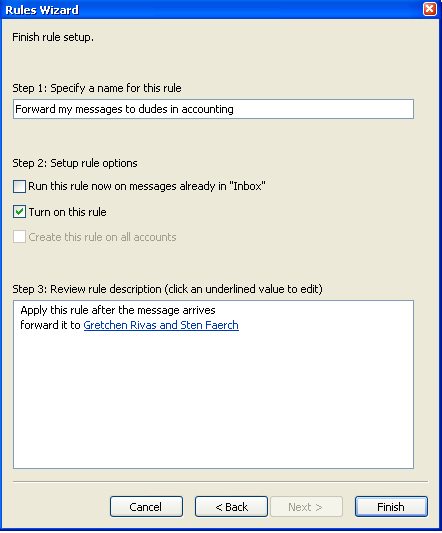
7. Under Specify a name for this rule, give your rule a name. Check the box for Turn on this rule if you would like Outlook to start forwarding messages now. Check Run this rule now on messages already in “Inbox” (rarely used) if you would like Outlook to forward everything that is already in your Inbox . Click Finish and you’re done.
Forwarding Email - Name and Finish

Forwarding messages from outlook to gmail


Forwarding messages from outlook to gmail


I have been asked to help some one to forward all his mail messages from Outlook exchange account to his Gmail folder.
So to achieve that you need to open your outlook.
Go to Tools->Rules and Alerts…
Rules and Alerts
Then you need to create a new rule. in the window that popped up you click on the new rule button.
create a new rule
Then you get the rule window with templates in it.
Click on next and you get the default rule that you are about to customize.
Change the marked item in the list of “Step 1:” to “through the specified account”
through the specified account
Click on the first link in the “Step 2:” box.

Select the account you want to forward
Select the account
Click on OK.
Then click on next and change the selection to “forward it to people or distribution list”

Go to “Step 2:” and click on the second link
In the window that opens type the email account you want to forward it to
email account
Now click on OK and Finish.
That is it. test the forward with an email self addressed.

Monday, January 14, 2013

How To Resize Your Windows 8 Partition


Windows 8 has the ability to re size the partition it is installed on.
This can come in handy since most computer manufactures completely hose the drive partition structure.
In addition I always recommend moving Libraries off the OS partition. For single disk system this step is required to do that.

*Author’s Note: I’ve prepared this article in preparation for the Windows 8 tweak guide.
disksaw_1
Open Disk Management
It is located at Control Panel > Administrative Tools > Computer Management > Disk Management.
Get there by:
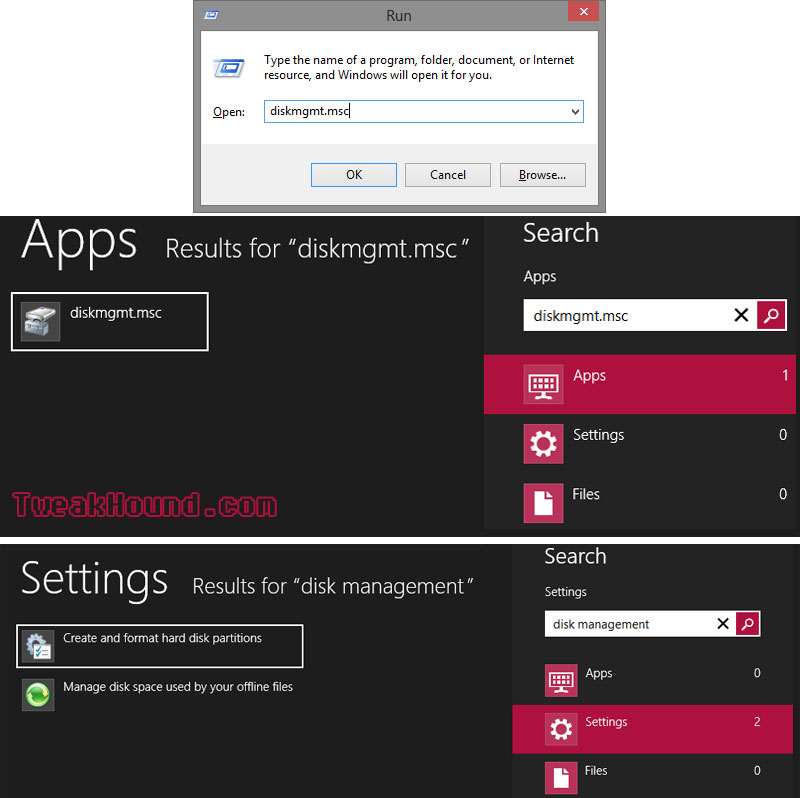
1 – Press the Windows + R keys and type diskmgmt.msc (or enter that command in the Search charm).
or
2 – Type disk management in the Search Charm > Settings > Create and format hard disk partitions.
shrink_diskmgmt

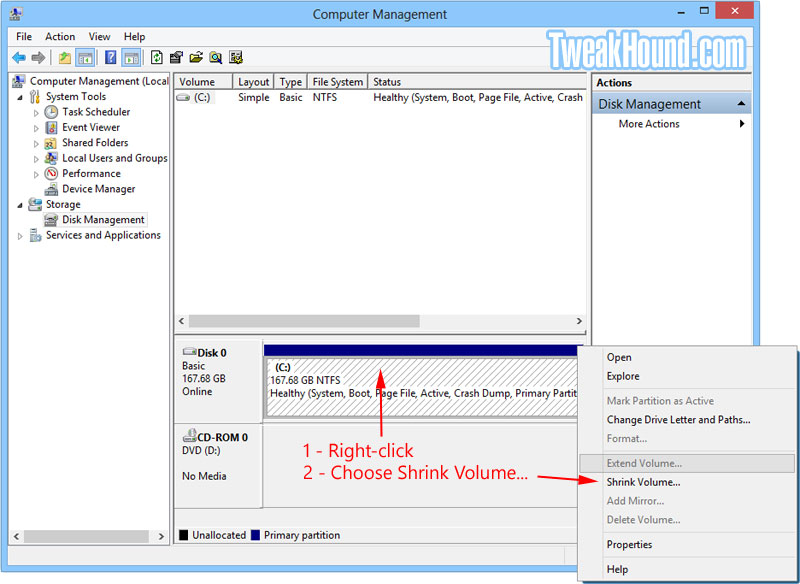
Choose the disk / partition you wish to edit, right-click on it, choose Shrink Volume…
shrink_1

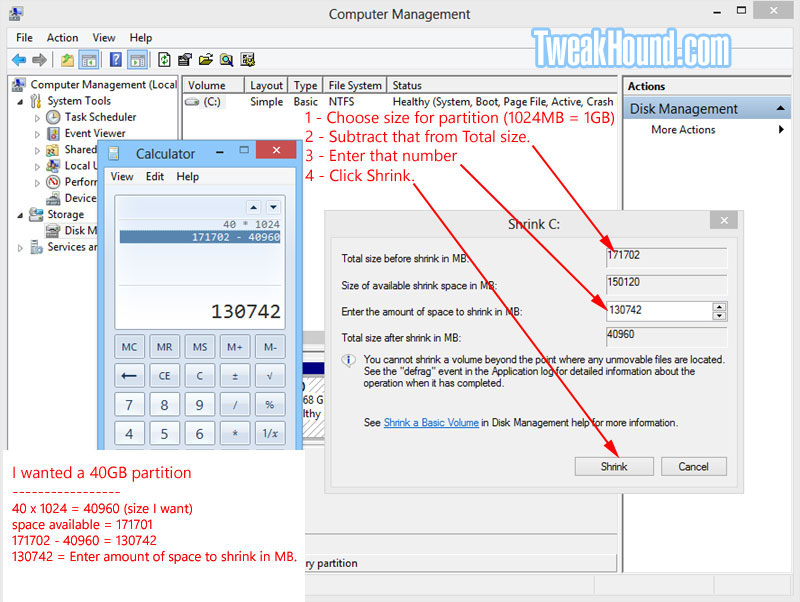
1 – Choose a size for your partition. Size is in MB and 1024MB = 1GB. I’ve been using 40GB (40960MB) which may be overkill but is future proof.
(Windows + R keys and type calc to get to calculator)
2 – Subtract the size you came up with in step one from the number in the box Total size before shrink in MB.
(In this example 171702 – 40960 = 130742)
3 – Enter that number in the box Enter the amount of space to shrink in MB.
4 – Click the Shrink button.
shrink_2

That is it for shrinking the OS partition. Read on to add a partition in the empty space.
We are still in Disk Management (if you left see the beginning of this article on how to get there).
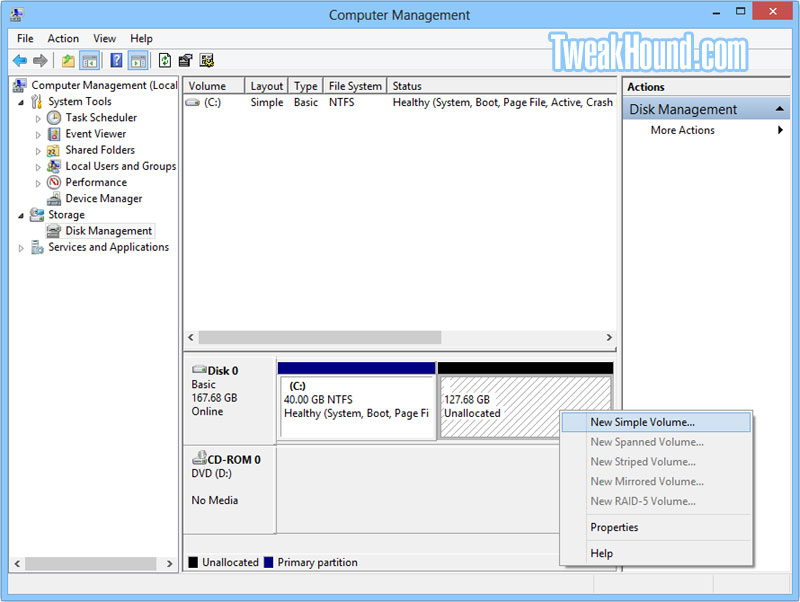
You’ll see empty space of your disk marked in black for unallocated space.
Right-click on it and choose New Simple Volume…
shrink_3

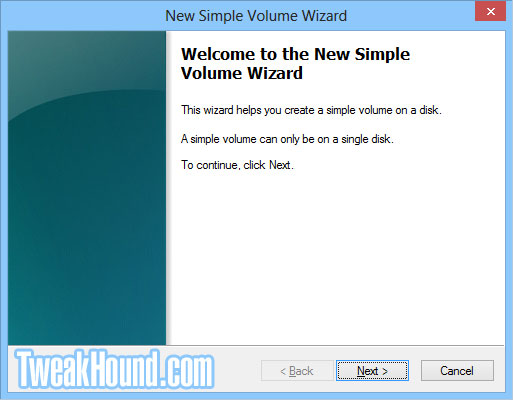
And “We’re off to see the Wizard”!
Click Next
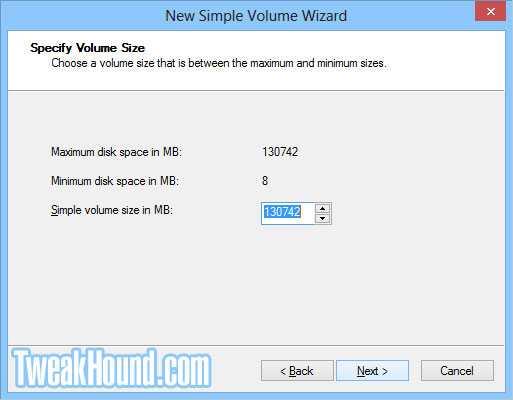
shrink_4

Use all the space or you can use less if desired. Click Next.
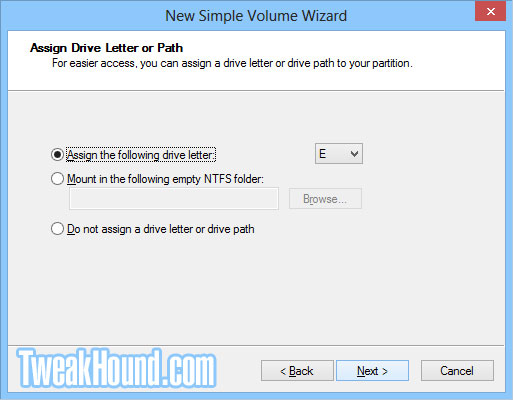
shrink_5

You can change the drive letter if you like but it isn’t necessary. Click Next
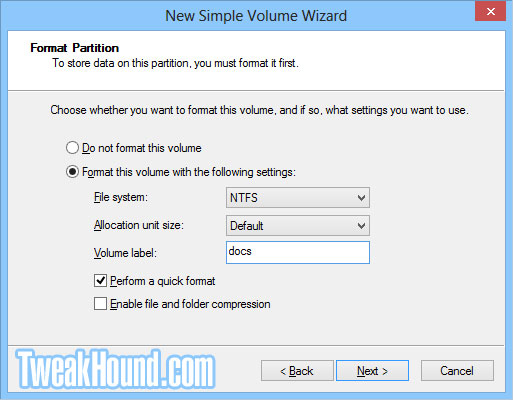
shrink_6

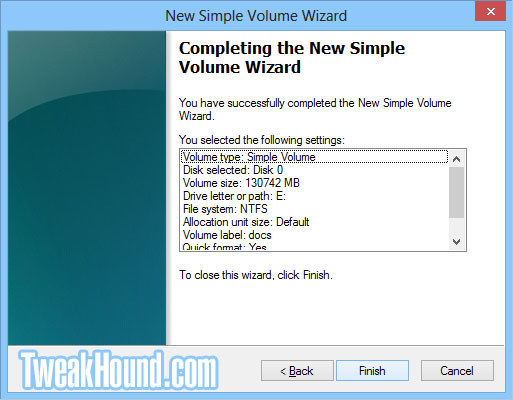
Name it. Since this is usually where I am going to move Libraries (once called My Documents) I name it docs.
You shouldn’t need to mess with any other settings here. Click Next.
shrink_7

All done!
shrink_8

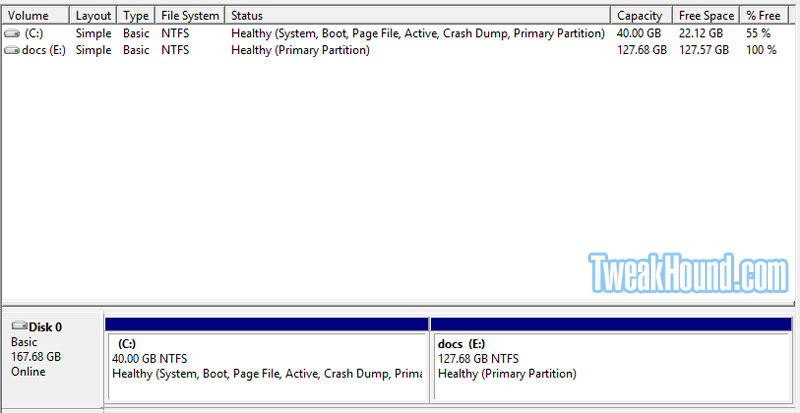
This is what it looks like on my laptop.
shrink_9

-END-

How to Set Up a Home Wireless Network on Windows 7, Windows Vista, or Windows XP


How to Set Up a Home Wireless Network on Windows 7, Windows Vista, or Windows XP

While many people can remember the days of dial-up modems and being shackled by physical wires, wireless Internet has become the standard for new home networks. Advancements in networking over the past two decades have provided the ability for more than one computer in a home to connect to the Internet at a time. Wireless networks also allow users to connect from anywhere within range of the router’s reach, giving users the luxury of checking their e-mail from their favorite spot on the couch.
Setting up a home wireless network is easier than ever. Here is a quick guide to get you started.
1. Check that your computer’s operating system supports wireless networking.The new Windows 7 operating system comes prepared to support wireless networking. Windows Vista and Windows XP users will be able to set up a wireless network, but it is recommended that users first consult Microsoft’s homepage and download the applicable service packs in order to make the process easier. These updates should be free if you already have the operating system installed.
2. Sign up for broadband Internet service. Most Internet service providers (ISPs) will provide wireless options such as Digital Subscriber Line (DSL) or cable internet. They’re generally sold on a monthly subscription basis.
3. Purchase a wireless router, DSL modem, or cable modem. Check with your ISP as they may provide this as part of your subscription fees.

4. Plug one end of a network cable into your modem to connect it to the port labeled Internet, WAN, or WLAN on your router. 
Some newer modem models come with networking technology built in. Make sure the router and modem are turned off when you connect them.
Once connected, turn on both devices.
5. Connect your computer to an open network port on your router. Your computer will not stay directly connected to the router, but this step is necessary in order to set up the network. Make sure not to plug your computer into the Internet port, WAN port, or WLAN port. If your computer is turned on, it should automatically recognize the router and establish a connection.
6. Visit the URL indicated in the router’s packaging to configure your router.Different routers have different instructions for this configuration, so follow the directions that accompany your model.
7. Establish your network name and security settings. You can decide whether to add password protection to your connection.
8. Disconnect your computer from the modem. Your wireless internet should now be correctly configured and ready to use.
9. Connect your other computers, printers, and gaming systems to the network.This should be as easy as following the device’s configuration settings and selecting your established network. Consult your device’s specific instructions, as necessary.
By following these easy steps, your home wireless network will be up and running in no time.

How to Protect your Files from Other Network Users by Disabling Admin Shares


How to Protect your Files from Other Network Users by Disabling Admin Shares

Is your office computer connected to a network? Do you have important files on your computer that are considered confidential and should not be seen or accessed by just anyone? If you answered yes to both questions, then you should read this article because it is meant for you. You may have a computer security problem that you may not even be aware of.
Do you know what an administrative share is? In the simplest terms, it is an automatic share that is created when Windows is installed on a computer. For a standalone PC, that shouldn’t be a real cause for concern but for a computer connected to a network, it’s dangerous. It can be dangerous because the shares created don’t only share a file or a folder; it shares the whole drive. In fact, it does the same thing for every partition on your computer. If, for example, you have drives C: and D: as existing partitions on your computer at the time you installed Windows XP Professional or Windows 7, you can be sure that your partitions were automatically shared. Most users are not even aware of this and this is where the problem lies.
With administrative shares, anyone who has an administrator level account on your computer can access all your files from another computer on the network. Normally, the only person who would have such an account would be the administrator of the network. That is acceptable but what if someone else at the office somehow got the login credentials to the administrator account? That person can rummage through all your files and access sensitive data. That same person can copy your files, view e-mail messages from an e-mail storage or even worse, delete important files. Find out how to fix this in the following sections.

Finding out if your Windows operating system created administrative shares

1.    Right-click on My Computer on the desktop and select Manage
2.    After the Computer Management console loads, expand Shared Folders
3.    Select Shares
4.    Look at the right side and see if your partitions are shared. It is easy to spot because it will look something like C$ or D$ which is dependent on your computer’s drive letters
If you find one or all of your partitions there, then you’ve got administrative shares. You should seriously consider disabling it to secure your computer. 
Loading the Registry Editor 
The best way to do this is to change a value in the registry. Follow the steps below to load the Registry Editor. 
1.    Press the Start button
2.    Select Run
3.    Type Regedit in the dialog box
4.    Select Ok and the Registry Editor loads afterwards
Disabling administrative shares 
In this task, we need to go to HKEY_LOCAL_MACHINE\System\CurrentControlSet\Services\LanManServer
\Parameters
To get there, please follow the steps below.

1.             Expand HKEY_LOCAL_MACHINE
2.             Expand System
3.             Expand CurrentControlSet
4.             Expand Services
5.             Expand LanManServer
6.             Select Parameters
7.             Look for the REG_DWORD entry named AutoShareWks
8.             Double-click on it and change the value to 0
In case the entry AutoShareWks does not exist, do the following:

1.    Right-click on the right side of the editor
2.    Select New, then DWORD
3.    Type AutoShareWks as the name of the entry
4.    Check that the value is 0
5.    Close the editor
6.    Reboot the computer

After rebooting, go back to the Computer Management console and check the shares again. It should now look something like the picture below.
That is all there is to it. Your files are now safe from other network users.